Posts

Showing posts with the label BL-Touch

Update: new BL-Touch mount with nozzle LED
Image
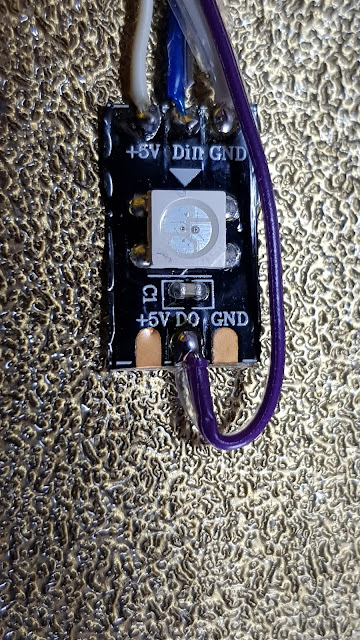
Today I have been working on installing the final cables into the chains. Having everything demountable was a lot more work, but it will make later changes and upgrades far simpler.  I started by creating the LED mount itself This takes a single Neopixel LED and connects a 5V power feed and data in and out. The 5V is already on the carriage and so, now, is the Neopixel data. This mounts to the modified BL-Touch mount as The other side of the mount now has low-profile cable routing included for both the new LED and the BL-Touch cabling The modified mount uses the same fixings as the original - to the rear of the carriage. I then needed to modify Marlin to increase the number of LEDs from 46 to 47. The other change is to add the facility to have a static Neopixel LED The cabling in the chain is now complete and it needs to be re-attached to the newly modified carriage mount. I have also been adding clear labelling to each of the cables so that they make sense in a few months' time. O...

Update: Testing and cable tidying

Image
I have now completed the cabling to the extruder carriage (except, see below) and have tested each part successfully. This has included a 5V feed for the Noctua fan which I have now installed. All of the parts seem to be working well. This includes the new shielded stepper cable which is now in place for the extruder motor. The other end of the cable goes into four positions in a 20-way socket and plug. This seems to work well and I can now create a similar cable for the X axis motor which will be the final element to connect through the new cable chains. All of the steppers will then terminate in this connector, allowing all to be removed if needed and for the shielding to be earthed at this common point. I am now left with a lot of cables and connectors on the carriage for which I am having to create mounts. For example, my BL-Touch mount has been modified to create built-in ribbon cable slots, to hold the cables more flushly than with the original cable tie base which was a little p...

Update: Started on cabling - and intolerant drawers

Image
I have now been running my combined X and Z axis cable chains for a while in testing, without any cables installed. This has been successful, so I wanted to start on creating the cable looms to replace the old (and very poor) umbilical.  One thing with the cable chains which was a little irritating was that there was a slight sag to the X axis chain due to its length and weight. While this wasn't really a problem, it was a itch which needed scratching. To create a simple resolution, I modified the design of the carriage mount an introduce a ten degree tilt to it, to offset the sag. This was a very simple solution and it seems to have worked.  By tilting the chain ever so slightly against the direction of sag, it has straightened it at the lowest point.  The next exercise was to create the cable looms. My ideal is to have each component on the carriage removable. I did toy with using a single connector for this, but the mix of currents and types made me decide against it. ...

More mopping up and a delivery arrives!

Image
Despite having changed it already, I was still not altogether happy with the mount for my Y axis cable chain where it meets the bed. I had lowered it to accommodate the BL-Touch, but I then also replaced the glass bed with with a thinner magnetic PEI-coated flexy bed . This made the bed a millimetre or so lower which made me wince every time the BL-Touch headed in the direction of the connector.  So, I went back to the drawing board and completely redesigned the fixing, changing it from a single horizontal screw above the mount to a pair of shorter vertical screws and a thin clamp bar. I also tweaked the fitting by a millimetre to bring the mounting just a little nearer to the bed, now that the glass top is no longer there.  I moved from this To this new version Which now sits very flush, as can be seen here. Another change I made to it was to remove one small support bar at the rear. Although this provided some theoretical extra support across the mount, it  did mean th...

New release: BL-Touch mount

Image
I have now completed the development and testing of my solution for a BL-Touch mount. It is working well and is a good solid mount.  Please visit the relevant build page for more details.  You can download the model from Cults 3D . Visit the main content pages